Home Page ----- Odyssey Home Page ----- Previous Page ----- Next Page
Cutting the Windshield

Cutting the Windshield

We "prototyped" the Lexan pieces, then used a linoleum cutter to cut the real Lexan windshield and windows.


We were a little unsure of how all the Lexan and frame pieces fit together.

So, being cautious not to ruin the Lexan, we purchased a sheet of wall panel from Lowe's. We used that to "Prototype" the Lexan pieces - windshield, door window, rear window.

Obviously, this is optional. However, it gave us peace of mind! When we used the Lexan, we knew exactly where everything went, had all the holes drilled and had exact replica's of how we should cut the Lexan.

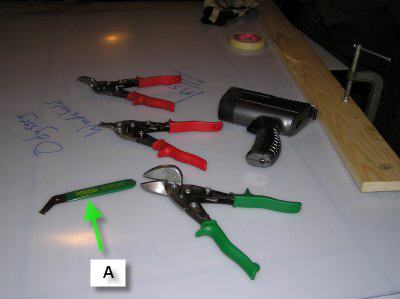
These are the tools we used for cutting the windshield and windows:

- green handled linoleum cutter (A).

- green, red and orange handled tin snippers for left-hand, right-hand and straight cuts. We used these on small or curved sections.

- a rechargable light.

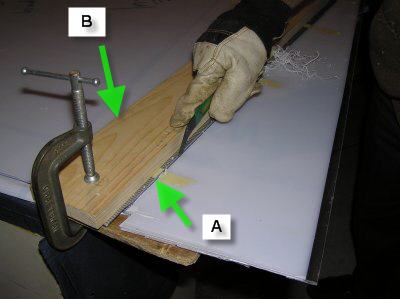
- a metal ruler, a board and two clamps. (You can see the ruler in the next photo). We clamped the ruler and board over the piece being cut so it would not shift. The ruler is lined up on the cut line and is also a guide for the cutting tool.

- masking tape. We used this to tape the ruler to the cut line on the windshield. This kept the ruler from shifting while we we clamped the board.

- gloves (seen in next photo) used just for protection.

Ed is cutting the windshield and using the ruler as a guide. Joanne is holding a light.

A - Ruler is taped to the windshield where we want to cut.

B - Board is used to clamp the ruler firmly to the table.

After cutting the prototype windshield, we sanded the edges with a sand block. This was an important step, as the edges are very sharp. These blocks are under $2 at home depot.

Home Page ----- Odyssey Home Page ----- Previous Page ----- Next Page