Home Page ----- Odyssey Home Page ----- Previous Page ----- Next Page
The Main Landing Gear

The Main Landing Gear

These photos show how we assembled the main gear.

See also "Rudder and Brake Cables" for brake cable routing inside the cabin and "Routing Brake Cables" for routing through the rear wall.


We used this common brake cylinder hole tool to clean out the rust from inside the main gear tubing.

Each of the three prongs has an abrasive end that acts like sandpaper.

We attach the tool to a drill and 'sand' the rust out of the tubing. This worked really well!

Installing the fiberglass is tough.

First, we put a little dialectric grease on the fiberglass near the tube entrance.

Then we put a small piece of sandpaper around the end of the fiberglass. We used our trusty rubber tightening tool over the sandpaper and turned the entire unit, pushing in at the same time.

The fiberglass rod went in very smoothly.

The next step is to drill a hole into the fiberglass and the tube for a bolt.

We used a hole locator tool. The underside is round and fits onto the tube. In the center is a hole that stabilizes the drill bit.

This photo shows Ed drilling the hole using the hole locator tool.

We needed to drill holes into the brake assembly so it aligns with the brake drum.

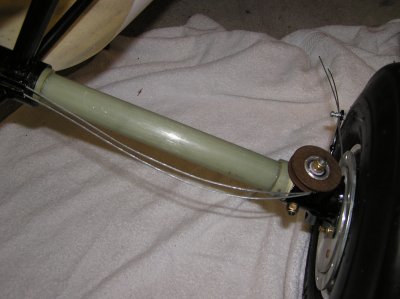
This photo shows a number of things.

- the tire is assembled on the brake assembly

- the brake cable comes out of the cabin and through two pre-assemble little tubes. One cable is the pilot's right brake and the other cable is the passenger's right brake. (this section does NOT show how the cables are routed from the cabin to the pre-assembled tubes. At this time, we were not sure of the impact of the rear wall. See the section called "Routing Brake Cables".)

- the brake cable then goes down the fiberglass tube and wraps around a round cable retainer.

- finally, the brake cable is screwed into the brake lever.

Home Page ----- Odyssey Home Page ----- Previous Page ----- Next Page